
FedEx® Return Solutions
Simplify your process to make returns easier for you and your customers.
Strengthen Loyalty With FedEx® Returns
Ninety-five percent of online shoppers in the U.S would shop again
with a retailer that provided a satisfactory return experience.*
Provide your customers with convenient return label options and an extensive network of drop-off locations.
FedEx return shipping solutions are reliable, simple to use, provide convenience and fast turnaround times — all competitive advantages for your business. Browse our selection of return label options below, or get started creating a return label with our step-by-step instructions:
Print a return label and include it in the original shipment to your customers or send it to them separately.
Use FedEx shipping tools to create and print a return label and related customs paperwork (if applicable), then include it either in the original shipment to your customer or in a separate correspondence. Your customer can then apply this label to the package as needed and drop it off at the nearest FedEx drop-off location.
The FedEx Print Return Label also gives you flexibility — no charges are assessed until the label is used. In addition, a Return Material Authorization (RMA) reference field, printed on the label and your invoice, is available to help you and your customers track the status of your return shipments.
The FedEx Print Return Label is available through the following shipping tools: FedEx Ship Manager™ at fedex.ca (including for FedEx Administration users), FedEx Ship Manager™ Software and FedEx Ship Manager™ Server.
The customer receives an email with a link and barcode they can use to access the label. They can:
Click the link to print the label and customs paperwork (if applicable) and apply it to the package, then drop the package off at the nearest FedEx drop-off location.
For your customer's convenience, the email also includes links for finding drop-off locations in the area and if applicable, instructions for international shipping.
The FedEx Email Return Label also gives you and your customer flexibility. You decide how much time your customer has to print the label, and no charges are assessed until the label is used. In addition, a Return Material Authorization (RMA) reference field, printed on the label and your invoice, is available to help you track your return shipments.
The FedEx Email Return Label is available through the following electronic shipping tools: FedEx Ship Manager™ at fedex.ca (including for FedEx Administration users), FedEx Ship Manager™ Software, and FedEx Ship Manager™ Server.

How to Create a Label
It’s easy to create linked and stand-alone return labels using FedEx Ship Manager™ at fedex.ca.
Follow these easy steps for creating return labels.


To create a linked outbound and return label, click "Create a Shipment" under the Prepare Shipment tab.
To create a stand-alone return label, click "Create Return Shipment" under the Prepare Shipment tab. Complete the required shipping information. Go to step 4 to finish completing your shipment.


Enter your recipient information, package and shipment details, then click the box at the bottom that says “Create a return shipment” Choose a FedEx® service. Then click the “Ship” button.


On the Package & Shipment Details area of the screen, you can choose to:
- Include a print return label with a shipment.
- Email a return label to your customer.
- Select a Ground Call Tag tag if you want FedEx to create and deliver the return shipping label to your customer.


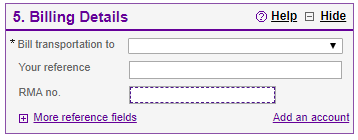
In the Billing Details area, enter your Return Material Authorization (RMA) number if applicable.
Click the "Ship" button to initiate your shipment and get your assigned tracking number.
For more details on how to create return shipments using FedEx Ship Manager™ at fedex.ca,
go to the Interactive Help Guide
Returns for Your Business

Find Additional Returns Services For Your Business

See One Company’s Success
with FedEx® Returns

Browse Our Convenient Access Points For Your Customers
Returns for Recipients
Received a Package That Needs to Be Returned?
Click here to find a drop-off location for your return

Learn more about returns for recipients